الأربعاء، 12 أكتوبر 2016

How To Unlink Phone Number From iMessage

Be The First To Comment

How To Unlink Phone Number From iMessage

ـــــــــــــــــــــــــــــــــــــــــــــــــــــــــــــــــــــــــــــــــــــــــــــــــــــــــــــــــــــــــــــــــــــــــــــــــــــــ
How to unlink phone number from iMessage? It is a necessary step for those who decide to move on to Android camp, because their Android device will not receive the text messages from other iPhone users if their number still linked to iMessage, on the mean times, the senders who use iPhone will get an acknowledgement of “message delivered”. If you also meet this situation, please do as following steps to unlink the iMesssage.

Method 1: Apple official website.

1. Visit the Apple official website My Support Profile, and log in with the Apple ID & password;


How To Unlink Phone Number From iMessage

2. You will see below list featuring all the devices linked to this Apple ID;

How To Unlink Phone Number From iMessage

3. Click on the device you want to unlink from the list;


How To Unlink Phone Number From iMessage


4. Click the “Disassociate”button;


How To Unlink Phone Number From iMessage

5. Click the “Disassociate”button again when you see a confirmation page;

How To Unlink Phone Number From iMessage

6. Please wait for a moment, and do not exit or close this page until it skip to a next page automatically;


How To Unlink Phone Number From iMessage

7. This page will show “successfully disassociated”, you need to click “Continue” button as a final step;


How To Unlink Phone Number From iMessage

By now, your phone number is supposed to be unlinked to this Apple ID, and you will be able to receive message on your Android device from iPhone senders. 


Method 2: Unofficial tricky method

1. Borrow an iPhone from a friend, and back up all his data;

2. Load your own SIM card, then activate this iPhone, and login the iMessage service with your phone number, and then close it;
3. Unload your SIM card, and erase all the settings and contents, then load your friend’s SIM card, and activate it restore all his backup data.

Note: If neither method works, please try to contact the Apple service hotline or look for professionals at the Genius Bar of your local Apple store.
الاثنين، 19 سبتمبر 2016

Detailed Solutions for unknown iTunes error 9

Be The First To Comment
Some Apple users may have met with the problem that when they restore their iDevice with iTunes, they can see  a dialog box with an unknown error 9 on iTunes . In addition, the reminder shows that iTunes could not restore this unknown error 9. This tutorial is mainly introducing five methods for you to solve the unknown error 9.


How did this unknown error 9 happened?

This error occurs when the device unexpectedly loses its USB connection with iTunes. This can occur if the device is manually disconnected during the restore process.

How to solve this unknown error 9?

Method one: Checking the USB cable.

1. When this problem occurs, you need to check the USB port.

2. Connect your iPhone/iPad/iPad touch to other USB ports of your Mac or PC. You are suggested to connect your iDevice to the USB port at the back of your PC. What’s more, the build-in USB 2.0 port is the best choice for you. After it’s connected, please try to restore your iDevice using iTunes.  

3. If this problem persists, please do the following operations:
* Please remove other USB devices, such as USB flash disk.

* Please remove all USB hubs, and then directly connect your iOS device to PC.

* Please bypass the base and then directly connect your iOS device to the attached USB cable.
  
* Please restart your computer.

* Please retry to restore your iDevice using iTunes.


Some Apple users reflected that this problem can be solved by quitting from third security software.

Method three: Using other computers to restore your iOS device.

If this problem persists, please try to use another computer to restore your iOS device. Firstly, please make sure that you have installed the latest iTunes on this computer. Besides, please ensure that this computer is equipped with the USB 2.0 port. And then you can directly connect your iOS device to PC.

Method four: Setting your iDevice in DFU mode and using official firmware to restore your iDevice

* At first, you need to put your iDevice in DFU mode. Firstly hold the Home button, and then the Power button. Continue holding them for about 4 seconds after the screen become blank, and then release the Power button. Keep holding the Home button, and then you can put your iDevice in DFU mode.

* You need to open iTunes, and iTunes will give you a reminder that it has detected an iPhone in DFU mode.

* Now you need to press the key “Shift” and click the button”Restore”. iTunes will show you a window to choose firmware, please remember to choose the official firmware.

Method five: Fixing your iDevice.

If you have tried all methods we mentioned above, but the problem is still persists, please find a mobile phone repairer to fix your iDevice .  

الاثنين، 2 مايو 2016

Downgrade 6.1.3 to 6.1.2

Be The First To Comment

Downgrade 6.1.3 to 6.1.2 – Redsn0w

Apple have recently released iOS 6.1.3 which, in effect, has closed down the evasi0n untethered jailbreak
 There is a way for some users to downgrade from 6.1.3 to 6.1.2 and continue to use evasi0n, however, 
this won’t work on A5 devices. It will only work on the iPhone 4, 3GS and iPod Touch 4. People on those devices must make sure they have saved their SHSH blobs as you can’t proceed without them.
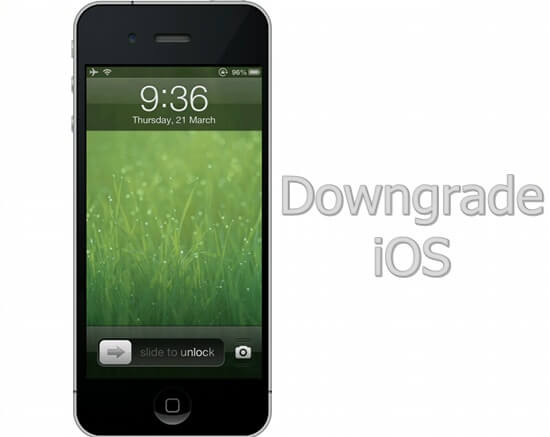
downgrade iOS
  1. Download the latest version of Redsn0w
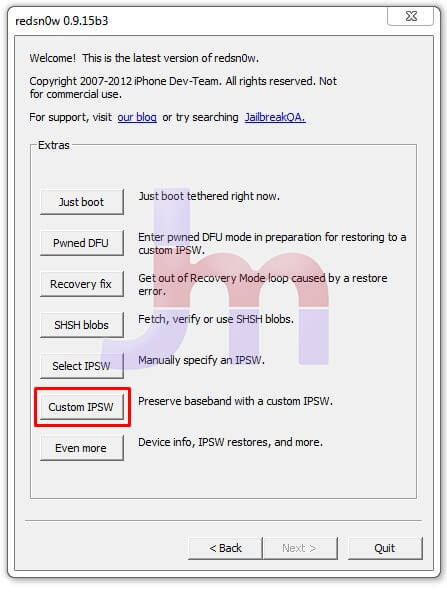
  2. If you are looking to hang on to your baseband unlock you have to build a custom IPSW. This should be done with an older version of Redsn0w or Sn0wbreeze.  Choose the one you are going to use, download it and launch it. Go to Extras >Custom IPSW and create it. – NOTE – only for the iPhone.
    redsn0w custom ipsw redsnow
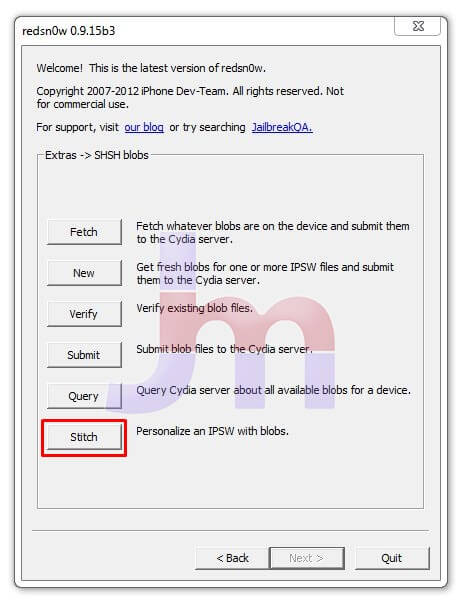
  3. Back to the newest Redsn0w and click on Extras > SHSH blobs > Stitch
    stitch ipsw redsn0w redsnow
  4. Locate the iOS 6.1.3 IPSW, or the custom one if necessary.
  5. Click on Local and locate your SHSH blobs. If you want you can go to Cydia as they will have them in their servers.
  6. Redsn0w will begin to create your new IPSW.
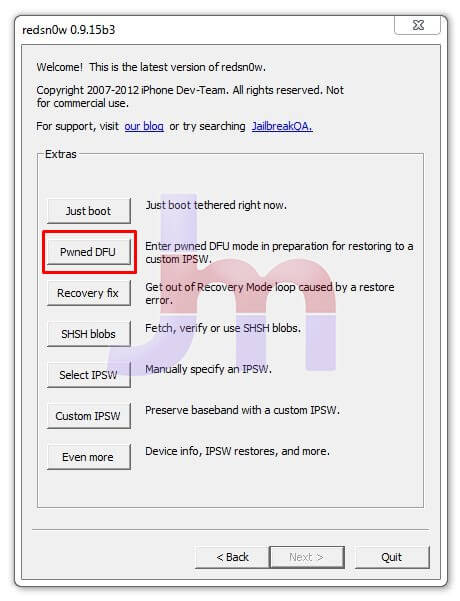
  7. Your device must now be put into Pwned DFU mode. On the redsn0w screen, click on Extras > Pwned DFU – make sure you follow the instructions on the screen properly. 
    redsn0w pwned dfu redsnow
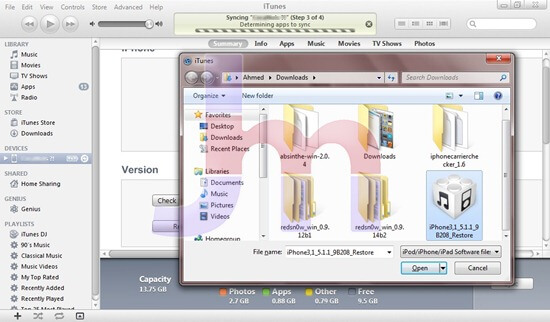
  8. Open up iTunes, press the Shift key if you are Windows user or Option if you are a Mac user; click on Restore at the same time.
    ipsw select restore itunes
  9. Choose the relevant IPSW and iTunes will restore your device to iOS 6.1.2.
  10. When the process is complete you can re-jailbreak with evasion following our tutorial here.

الأحد، 1 مايو 2016

Free iPhone IMEI Checker

Be The First To Comment

Free iPhone IMEI Checker and Unlocking services


Unlocking your iPhone is easier 

than you think !


Samsung New Security FRP Lock Solution

Be The First To Comment
Samsung New Security FRP Lock Solution
------------------------------------------------------------------------------

SideSync Samsung
For Windows:
...........................................................................................................
For Mac:

Steps:
1. Download and install SideSync on your pc
2. Open SideSync and connet your Mobile
3. A menu will appear to choose Browser choose Internet Browser
5. Click on Bookmarks -> History -> Download history
6. Install hua.apk
5. Open hua.apk and then go to security and make a pin for screen lock 0000
6. Go to Other security settings - > trusted agents -> turn off google smart lock
7. Go to easy mode and choose Easy mode then done
8. Go back to setting.apk and choose standard mode and then done
9. Keep repeating step 7-8 until the home screen appears in normal mode
10. Go to google play, and enter your pin 0000 and set up and new google account
11. Restart the phone once completed, then go to Settings - > accounts and remove the google account
12. Go to download mode and See FRP Lock is OFF
Now to a Factory reset and go through the activation process normally it will not ask for Gmail to activation

Done This Steps In SAMSUNG NEW SECURITY SM-J700F

الاثنين، 25 أبريل 2016

3uTools Downgrades iPhone 4 from iOS7.1.2 to iOS 6.0.1 Tutorial

Be The First To Comment

3uTools can downgrade iPhone 4 from iOS7.1.2 to iOS 4.0-6.1.3 only in the case that you have backuped the particular SHSH files before


Notes before flash:
1. Please use iTunes to backup your important data before flash.
2. Please directly connect your device to the computer via the USB cable, and don't use the extension cable or front USB.
3. Ensure you remember your iCloud account and password, or your device can't be activated after flash.
4. If the app immediately jumps to the main menu as you click the app icon after flash, please reinstall the app.
5. Check the box of “Don't erase user’s data” so that your phone data can be stored.
6. Steps to enter DFU mode: Keep the device in normal mode or recovery mode, plug in USB cable (please don't use USB extension cable); hold HOME button, then hold power button till the screen becomes blank; release the POWER button after about 4 seconds, but keep holding the HOME button for about 10 seconds.


Step 1. Ensure you have installed the iTunes on your computer, and then download the latest version of 3uTools.

 3uTools Downgrades iPhone 4 from iOS7.1.2 to iOS 6.0.1 Tutorial

Step 2.  Click Flash Jailbreak→Pro flash→Query SHSH. And then you can see which firmware versions you can flash your device to if you have backuped the SHSH files before.

3uTools Downgrades iPhone 4 from iOS7.1.2 to iOS 6.0.1 Tutorial

3uTools Downgrades iPhone 4 from iOS7.1.2 to iOS 6.0.1 Tutorial


Step 3. Download firmware. For example, you want to flash it to iOS6.0.1 now. Click "Firmware"→choose "iPhone 4"→click the downloading icon of “iOS6.0.1”.
 
3uTools Downgrades iPhone 4 from iOS7.1.2 to iOS 6.0.1 Tutorial

Step 4. Click the icon on the upper right corner to enter Download center, and please wait till the download is completed.

 3uTools Downgrades iPhone 4 from iOS7.1.2 to iOS 6.0.1 Tutorial

Step 5. Click Completed→click the yellow icon of “search” to confirm the firmware location.


3uTools Downgrades iPhone 4 from iOS7.1.2 to iOS 6.0.1 Tutorial

3uTools Downgrades iPhone 4 from iOS7.1.2 to iOS 6.0.1 Tutorial


Step6. Click Flash Jailbreak→Pro flash→Select Firmware, and then pick up the firmware. Click Flash now to begin the flash.

3uTools Downgrades iPhone 4 from iOS7.1.2 to iOS 6.0.1 Tutorial

Step7Please wait till the flash is completed. When the iTunes sends a reminder in the flashing process, please cancel the box, or your device will be restored to the latest iOS version instead of 6.0.1 on iTunes!

 3uTools Downgrades iPhone 4 from iOS7.1.2 to iOS 6.0.1 Tutorial


 * As to the feature of backuping SHSH file, it is involved in the toolbar of "Advanced" on 3uTools.
 3uTools Downgrades iPhone 4 from iOS7.1.2 to iOS 6.0.1 Tutorial

 *3uTools will probably downgrade more devices later, but it can currently downgrade the following devices:
1. iPhone 3GS without SHSH file backup can be downgraded to iOS4.1 using 3uTools.
2. iPhone 4 with SHSH file backups can be downgraded to any compatible firmware using 3uTools.
3. iPhone 4s/5/5s/6/6Plus/6s/6sPlus, iPad 2/3/4, iPad Pro, iPad Air 1/2, iPod Touch5/6, and iPad mini 1/2/3/4 can be downgraded from the 9.3 to 9.2.1 using 3uTools.

 *Tips for other devices:
1.iPhone 4s without SHSH file backup can be downgraded to iOS 6.1.3 using odysseus-0.4.
   2.iPhone 5 with SHSH file backup can be downloaded to iOS7.0.4 using odysseus-0.4.
   3. iPhone 5s can't be downgraded with whichever tool.

Blogger Tricks


© 2011 3uTools-Eg - Designed by Mukund | ToS | Privacy Policy | Sitemap

About Us | Contact Us | Write For Us